AntiNex - Network Data Analysis Pipeline
This is a distributed python 3 framework for automating network traffic capture and converting it into a csv file. Once you have a csv file you can build, train and tune machine learning models to defend your own infrastructure by actively monitoring the network layer.
It supports auto-publishing captured network traffic to the AntiNex REST API for using pre-trained Deep Neural Networks to make predictions on if this is an attack record or not using the AntiNex Core. Please refer to the Making Live Predictions using Pre-trained Neural Networks section for more details. Publishing to the REST API can run inside docker as well.
There are many choices to build a machine learning or AI model but for now I am using Jupyter Hub to build a pre-trained model for defending against OWASP Dynamic Analysis tools for finding vulnerabilities running in my owasp-jenkins repository.
- Django REST Framework + JWT + Swagger - run prepare-dataset and train-keras-deep-neural-network using a multi-tenant Django 2.0+ REST API server supporting JWT and Swagger
- Simulations directory - capturing simulated attacks using ZAP with Django, Flask, React, Vue, and Spring
- Prepare Dataset section - preparing training csvs from captured recordings
- Train Models section - training machine learning and AI models from prepared csvs and please check out the AntiNex Core which has accuracies over 99.8% and a Jupyter notebook
- Datasets repository - captured recordings if you want to see what some of the data will look like
Why?
After digging into how Internet Chemotherapy worked with a simple Nerfball approach, I wanted to see if I could train machine learning and AI models to defend this type of attack. Since the network is the first line to defend on the edge, on-premise or in the cloud, I wanted to start building the first line of defense and open source it. Also I do not know of any other toolchains to build defensive models using the network layer for free.
This repository automates dataset creation for training models by capturing network traffic on layers 2, 3 and 4 of the OSI model. Once a dataset has been Prepared it can be used to Train a Deep Neural Network. Pre-trained Deep Neural Networks can make live predictions on good or bad network traffic with the AntiNex Core.
How does it work?
This framework uses free open source tools to create the following publish-subscriber workflow:
- Network traffic matches a capture tool filter
- Capture tool converts packet layers into JSON
- Capture tool publishes converted JSON dictionary to a message broker (Redis or RabbitMQ)
- Packet processor consumes dictionary from message broker
- Packet processor flattens dictionary
- Packet processor periodically writes csv dataset from collected, flattened dictionaries (configurable for snapshotting csv on n-th number of packets consumed)
- Flatten packets are published using JWT to a pre-trained Deep Neural Network for making predictions on if the network traffic is good or bad
Envisioned Deployment
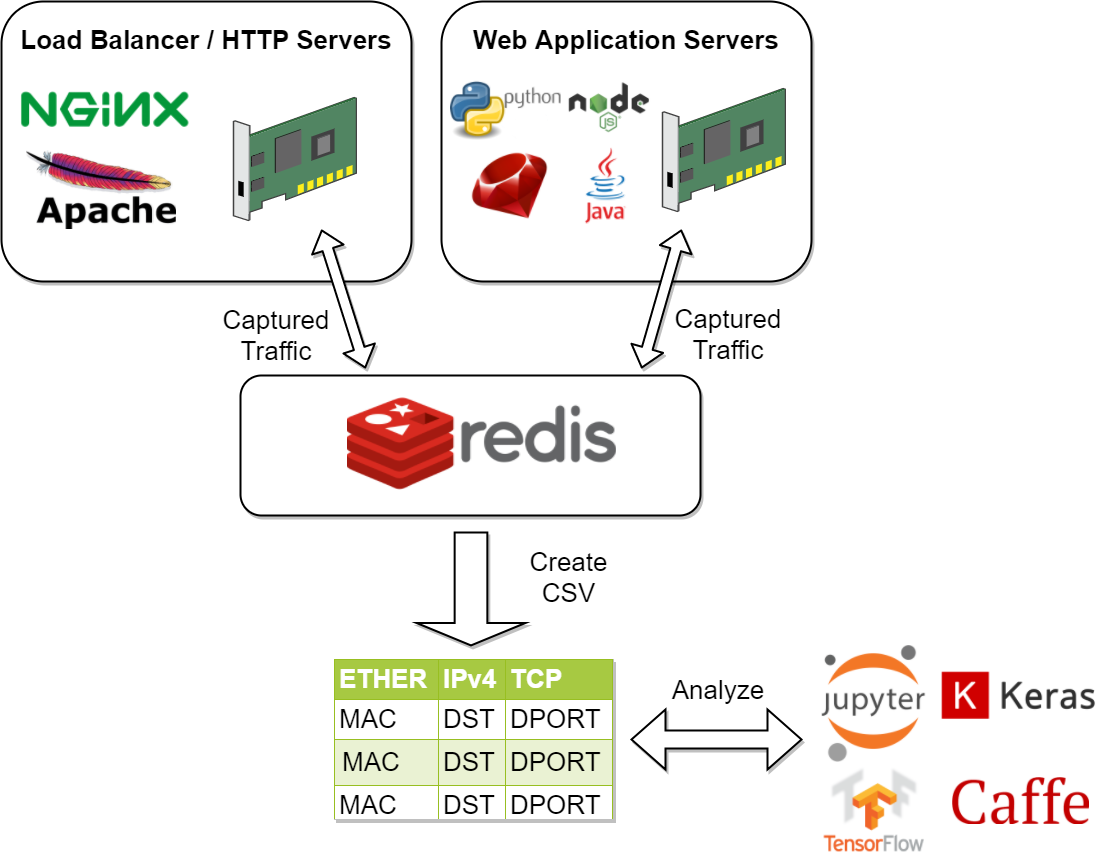
- For on-premise and cloud environments, this framework would deploy capture tools to load balancers and application servers. These capture tool agents would publish to a redis cluster outside of the load balancers and application servers for analysis. By doing this, models could also be tuned to defend on the load balancer tier or application server tier independently.
- Remote edge machines would be running deployed, pre-trained, package-maintained models that are integrated with a prediction API. Periodic uploads of new, unexpected records would be sent encrypted back to the cloud for retraining models for helping defend an IoT fleet.
Detailed Version
The pipeline is a capture forwarding system focused on redundancy and scalability. Components-wise there are pre-configured capture tools that hook into the network devices on the operating system. If the capture tools find any traffic that matches their respective filter, then they json-ify the captured packet and forward it as a nested dictionary to a redis server (rabbitmq works as well, but requires setting the environment variables for authentication). Once the traffic packet dictionaries are in redis/rabbitmq, the packet processor consumes the nested dictionary and flattens them using pandas. The packet processors are set up to write csv datasets from the consumed, flattened dictionaries every 100 packets (you can configure the SAVE_AFTER_NUM environment variable to a larger number too).
Here are the included, standalone capture tools (all of which require root privileges to work):


What packets and layers are supported?
How do I get started?
Install from pypi or build the development environment
pip install network-pipeline
Or you can set up the repository locally
mkdir -p -m 777 /opt/antinex
git clone https://github.com/jay-johnson/network-pipeline.git /opt/antinex/pipeline
cd /opt/antinex/pipeline
virtualenv -p python3 /tmp/netpipevenv && source /tmp/netpipevenv/bin/activate && pip install -e .
Start Redis
This guide assumes redis is running in docker, but as long as there’s an accessible redis server on port 6379 you can use that too. RabbitMQ works as well, but requires setting the environment variables for connectivity.
# if you do not have docker-compose installed, you can try to install it with:
# pip install docker-compose
./start.sh
Verify Redis is Working
redis-cli
or
telnet localhost 6379
Start Packet Processor for Consuming Messages
Activate the virtual environment
source /tmp/netpipevenv/bin/activate
Start it up
./network_pipeline/scripts/packets_redis.py
Making Live Predictions using Pre-trained Neural Networks
There are a few ways to make live predictions depending on how the pipeline and AntiNex assets are deployed:
Running the Full Django REST API stack using compose.yml (Co-located mode)
This will start the Packet Processor using the default compose.yml file:
Clone the repo:
git clone https://github.com/jay-johnson/train-ai-with-django-swagger-jwt.git /opt/antinex/api
cd /opt/antinex/api
Start the co-located container stack with the
compose.ymlfile:docker-compose -f compose.yml up -d
Running Only the Network Pipeline compose.yml (Distributed mode)
This will just start the Network Pipeline container and assumes the REST API is running on another host.
https://github.com/jay-johnson/network-pipeline/blob/master/compose.yml
Use the command:
docker-compose -f compose.yml up
Running the Packet Processor Manually Using Environment Variables (Development mode)
Make sure to source the correct environment file before running
packets_redis.py(Packet Processor).As an example the repository has a version that works with the compose.yml docker deployment:
source envs/antinex-dev.env
When building your own credentials and datasets, you may have special characters in the env file. Please use
set -o allexport; source envs/antinex-dev.env; set +o allexport;to handle this case.Right now the defaults do not have special characters, so the
sourcecommand works just fine:export ANTINEX_PUBLISH_ENABLED=1 export ANTINEX_URL=http://localhost:8010 export ANTINEX_USER=root export ANTINEX_EMAIL=123321 export ANTINEX_PASSWORD=123321 export ANTINEX_PUBLISH_TO_CORE=1 export ANTINEX_USE_MODEL_NAME=Full-Django-AntiNex-Simple-Scaler-DNN export ANTINEX_PUBLISH_REQUEST_FILE=/opt/antinex/client/examples/predict-rows-scaler-full-django.json export ANTINEX_FEATURES_TO_PROCESS=idx,arp_hwlen,arp_hwtype,arp_id,arp_op,arp_plen,arp_ptype,dns_default_aa,dns_default_ad,dns_default_an,dns_default_ancount,dns_default_ar,dns_default_arcount,dns_default_cd,dns_default_id,dns_default_length,dns_default_ns,dns_default_nscount,dns_default_opcode,dns_default_qd,dns_default_qdcount,dns_default_qr,dns_default_ra,dns_default_rcode,dns_default_rd,dns_default_tc,dns_default_z,dns_id,eth_id,eth_type,icmp_addr_mask,icmp_code,icmp_gw,icmp_id,icmp_ptr,icmp_seq,icmp_ts_ori,icmp_ts_rx,icmp_ts_tx,icmp_type,icmp_unused,ip_id,ip_ihl,ip_len,ip_tos,ip_version,ipv6_fl,ipv6_hlim,ipv6_nh,ipv6_plen,ipv6_tc,ipv6_version,ipvsix_id,pad_id,tcp_dport,tcp_fields_options.MSS,tcp_fields_options.NOP,tcp_fields_options.SAckOK,tcp_fields_options.Timestamp,tcp_fields_options.WScale,tcp_id,tcp_seq,tcp_sport,udp_dport,udp_id,udp_len,udp_sport export ANTINEX_IGNORE_FEATURES= export ANTINEX_SORT_VALUES= export ANTINEX_ML_TYPE=classification export ANTINEX_PREDICT_FEATURE=label_value export ANTINEX_SEED=42 export ANTINEX_TEST_SIZE=0.2 export ANTINEX_BATCH_SIZE=32 export ANTINEX_EPOCHS=15 export ANTINEX_NUM_SPLITS=2 export ANTINEX_LOSS=binary_crossentropy export ANTINEX_OPTIMIZER=adam export ANTINEX_METRICS=accuracy export ANTINEX_HISTORIES=val_loss,val_acc,loss,acc export ANTINEX_VERSION=1 export ANTINEX_CONVERT_DATA=1 export ANTINEX_CONVERT_DATA_TYPE=float export ANTINEX_MISSING_VALUE=-1.0 export ANTINEX_INCLUDE_FAILED_CONVERSIONS=false export ANTINEX_CLIENT_VERBOSE=1 export ANTINEX_CLIENT_DEBUG=0
Load the Deep Neural Network into the AntiNex Core
Note: If you are running without the docker containers, please make sure to clone the client and datasets to disk:
mkdir -p -m 777 /opt/antinex
git clone https://github.com/jay-johnson/antinex-client.git /opt/antinex/client
git clone https://github.com/jay-johnson/antinex-datasets.git /opt/antinex/antinex-datasets
Load the Django Model into the Core
Please note this can take a couple minutes…
ai_train_dnn.py -u root -p 123321 -f deep-neural-networks/full-django.json

...

30196    -1.0 -1.000000  -1.000000
30197    -1.0 -1.000000  -1.000000
30198    -1.0 -1.000000  -1.000000
30199    -1.0 -1.000000  -1.000000

[30200 rows x 72 columns]
Capture Network Traffic
These tools are installed with the pip and require running with root to be able to hook into the local network devices for capturing traffic correctly.
Scapy currently provides the traffic capture tooling, but the code already has a semi-functional scalable, multi-processing engine to replace it. This will be ideal for dropping on a heavily utilized load balancer tier and run as an agent managed as a systemd service.
Login as root
sudo su
Activate the Virtual Environment
source /tmp/netpipevenv/bin/activate
Capture TCP Data
By default TCP capture is only capturing traffic on ports: 80, 443, 8010, and 8443. This can be modified with the
NETWORK_FILTERenvironment variable. Please avoid capturing on the redis port (default 6379) and rabbitmq port (default 5672) to prevent duplicate sniffing on the already-captured data that is being forwarded to the message queues which are ideally running in another virtual machine.This guide assumes you are running all these tools from the base directory of the repository.
./network_pipeline/scripts/capture_tcp.py
Capture SSH Traffic
./network_pipeline/scripts/capture_ssh.py
Capture Telnet Traffic
./network_pipeline/scripts/capture_telnet.py
Capture UDP Data
With another terminal, you can capture UDP traffic at the same time
sudo su
Start UDP capture tool
source /tmp/netpipevenv/bin/activate && ./network_pipeline/scripts/capture_udp.py
Capture ARP Data
With another terminal, you can capture ARP traffic at the same time
sudo su
Start ARP capture tool
source /tmp/netpipevenv/bin/activate && ./network_pipeline/scripts/capture_arp.py
Capture ICMP Data
With another terminal, you can capture ICMP traffic at the same time
sudo su
Start ICMP capture tool
source /tmp/netpipevenv/bin/activate && ./network_pipeline/scripts/capture_icmp.py
Simulating Network Traffic
ZAP Testing with Web Applications

The repository includes ZAPv2 simulations targeting the follow application servers:
I will be updating this guide with more ZAP simulation tests in the future.
Please refer to the Simulations README for more details on running these to capture network traffic during an attack.
Quick Simulations
If you want to just get started, here are some commands and tools to start simulating network traffic for seeding your csv datasets.
Send a TCP message
./network_pipeline/scripts/tcp_send_msg.py
Send a UDP message
(Optional) Start a UDP server for echo-ing a response on port 17000
sudo ./network_pipeline/scripts/listen_udp_port.py
2018-01-27T17:39:47.725377 - Starting UDP Server address=127.0.0.1:17000 backlog=5 size=1024 sleep=0.5 shutdown=/tmp/udp-shutdown-listen-server-127.0.0.1-17000
Send the UDP message
./network_pipeline/scripts/udp_send_msg.py
sending UDP: address=('0.0.0.0', 17000) msg=testing UDP msg time=2018-01-27 17:40:04 - cc9cdc1a-a900-48c5-acc9-b8ff5919087b
(Optional) Verify the UDP server received the message
2018-01-27T17:40:04.915469 received UDP data=testing UDP msg time=2018-01-27 17:40:04 - cc9cdc1a-a900-48c5-acc9-b8ff5919087b
Simulate traffic with common shell tools
nslookup 127.0.0.1; nslookup 0.0.0.0; nslookup localhost
dig www.google.com; dig www.cnn.com; dig amazon.com
wget https://www.google.com; wget http://www.cnn.com; wget https://amazon.com
ping google.com; ping amazon.com
Run all of them at once
nslookup 127.0.0.1; nslookup 0.0.0.0; nslookup localhost; dig www.google.com; dig www.cnn.com; dig amazon.com; wget https://www.google.com; wget http://www.cnn.com; wget https://amazon.com; ping google.com; ping amazon.com
Capturing an API Simulation
Simulations that can automate + fuzz authenticated REST API service layers like ZAP are available in the AntiNex datasets repository for training Deep Neural Networks. The included Flask ZAP Simulation does login using OAuth 2.0 with ZAP for REST API validation, but there is a known issue with the swagger openapi integration within ZAP that limits the functionality (for now):
https://github.com/zaproxy/zaproxy/issues/4072
Start a local server listening on TCP port 80
sudo ./network_pipeline/scripts/listen_tcp_port.py
2018-01-27T23:59:22.344687 - Starting Server address=127.0.0.1:80 backlog=5 size=1024 sleep=0.5 shutdown=/tmp/shutdown-listen-server-127.0.0.1-80
Run a POST curl
curl -i -vvvv -POST http://localhost:80/TESTURLENDPOINT -d '{"user_id", "1234", "api_key": "abcd", "api_secret": "xyz"}'
*   Trying 127.0.0.1...
* TCP_NODELAY set
* Connected to localhost (127.0.0.1) port 80 (#0)
> POST /TESTURLENDPOINT HTTP/1.1
> Host: localhost
> User-Agent: curl/7.55.1
> Accept: */*
> Content-Length: 59
> Content-Type: application/x-www-form-urlencoded
>
* upload completely sent off: 59 out of 59 bytes
POST /TESTURLENDPOINT HTTP/1.1
Host: localhost
User-Agent: curl/7.55.1
Accept: */*
Content-Length: 59
Content-Type: application/x-www-form-urlencoded

* Connection #0 to host localhost left intact
{"user_id", "1234", "api_key": "abcd", "api_secret": "xyz"}
Verify local TCP server received the POST
2018-01-28T00:00:54.445294 received msg=7 data=POST /TESTURLENDPOINT HTTP/1.1
Host: localhost
User-Agent: curl/7.55.1
Accept: */*
Content-Length: 59
Content-Type: application/x-www-form-urlencoded

{"user_id", "1234", "api_key": "abcd", "api_secret": "xyz"} replying
Larger Traffic Testing
Host a local server listening on TCP port 80 using
ncsudo nc -l 80
Send a large TCP msg to the
ncserver./network_pipeline/scripts/tcp_send_large_msg.py
Inspecting the CSV Datasets
By default, the dataset csv files are saved to: /tmp/netdata-*.csv and you can set a custom path by exporting the environment variables DS_NAME, DS_DIR or OUTPUT_CSV as needed.
ls /tmp/netdata-*.csv
/tmp/netdata-2018-01-27-13-13-58.csv  /tmp/netdata-2018-01-27-13-18-25.csv  /tmp/netdata-2018-01-27-16-44-08.csv
/tmp/netdata-2018-01-27-13-16-38.csv  /tmp/netdata-2018-01-27-13-19-46.csv
/tmp/netdata-2018-01-27-13-18-03.csv  /tmp/netdata-2018-01-27-13-26-34.csv
Prepare Dataset
This is a guide for building training datasets from the recorded csvs in the network pipeline datasets repository. Once a dataset is prepared locally, you can use the modelers to build and tune machine learning and AI models.
Install
This will make sure your virtual environment is using the latest pandas pip and install the latest ML/AI pips. Please run it from the repository’s base directory.
source /tmp/netpipevenv/bin/activate
pip install --upgrade -r ./network_pipeline/scripts/builders/requirements.txt
Overview
I have not uploaded a local recording from my development stacks, so for now this will prepare a training dataset by randomly applying non-attack - 0 and attack - 1 labels for flagging records as attack and non-attack records.
Setup
Please export the path to the datasets repository on your host:
export DS_DIR=<path_to_datasets_base_directory>
Or clone the repository to the default value for the environment variable (DS_DIR=/opt/antinex/datasets) with:
mkdir -p -m 777 /opt/antinex
git clone https://github.com/jay-johnson/network-pipeline-datasets.git /opt/antinex/datasets
Build Dataset
This will take a few moments to prepare the csv files.
prepare_dataset.py
2018-01-31 23:38:04,298 - builder - INFO - start - builder
2018-01-31 23:38:04,298 - builder - INFO - finding pipeline csvs in dir=/opt/antinex/datasets/*/*.csv
2018-01-31 23:38:04,299 - builder - INFO - adding file=/opt/antinex/datasets/react-redux/netdata-2018-01-29-13-36-35.csv
2018-01-31 23:38:04,299 - builder - INFO - adding file=/opt/antinex/datasets/spring/netdata-2018-01-29-15-00-12.csv
2018-01-31 23:38:04,299 - builder - INFO - adding file=/opt/antinex/datasets/vue/netdata-2018-01-29-14-12-44.csv
2018-01-31 23:38:04,299 - builder - INFO - adding file=/opt/antinex/datasets/django/netdata-2018-01-28-23-12-13.csv
2018-01-31 23:38:04,299 - builder - INFO - adding file=/opt/antinex/datasets/django/netdata-2018-01-28-23-06-05.csv
2018-01-31 23:38:04,299 - builder - INFO - adding file=/opt/antinex/datasets/flask-restplus/netdata-2018-01-29-11-30-02.csv
Verify Dataset and Tracking Files
By default the environment variable OUTPUT_DIR writes the dataset csv files to /tmp:
ls -lrth /tmp/*.csv
-rw-rw-r-- 1 jay jay  26M Jan 31 23:38 /tmp/fulldata_attack_scans.csv
-rw-rw-r-- 1 jay jay 143K Jan 31 23:38 /tmp/cleaned_attack_scans.csv
Additionally, there are data governance, metadata and tracking files created as well:
ls -lrth /tmp/*.json
-rw-rw-r-- 1 jay jay 2.7K Jan 31 23:38 /tmp/fulldata_metadata.json
-rw-rw-r-- 1 jay jay 1.8K Jan 31 23:38 /tmp/cleaned_metadata.json
Train Models
I am using Keras to train a Deep Neural Network to predict attack (1) and non-attack (0) records using a prepared dataset. Please checkout the keras_dnn.py module if you are interested in learning more. Please let me know if there are better ways to set up the neural network layers or hyperparameters as well.
Source the virtual environment
source /tmp/netpipevenv/bin/activate
(Optional) Train with a different dataset
By default the environment variable
CSV_FILE=/tmp/cleaned_attack_scans.csvcan be changed to train models with another prepared dataset.To do so run:
export CSV_FILE=<path_to_csv_dataset_file>
Train a Keras Deep Neural Network
Included in the pip is a keras_dnn.py script. Below is a sample log from a training run that scored an 83.33% accuracy predicting attack vs non-attack records.
Please note, this can take a few minutes if you are not using a GPU. Also the accuracy results will be different depending on how you set up the model.
keras_dnn.py
Using TensorFlow backend.
2018-02-01 00:01:30,653 - keras-dnn - INFO - start - keras-dnn
2018-02-01 00:01:30,653 - keras-dnn - INFO - Loading csv=/tmp/cleaned_attack_scans.csv
2018-02-01 00:01:30,662 - keras-dnn - INFO - Predicting=label_value with features=['eth_type', 'idx', 'ip_ihl', 'ip_len', 'ip_tos', 'ip_version', 'label_value', 'tcp_dport', 'tcp_fields_options.MSS', 'tcp_fields_options.Timestamp', 'tcp_fields_options.WScale', 'tcp_seq', 'tcp_sport'] ignore_features=['label_name', 'ip_src', 'ip_dst', 'eth_src', 'eth_dst', 'src_file', 'raw_id', 'raw_load', 'raw_hex_load', 'raw_hex_field_load', 'pad_load', 'eth_dst', 'eth_src', 'ip_dst', 'ip_src'] records=2217
2018-02-01 00:01:30,664 - keras-dnn - INFO - splitting rows=2217 into X_train=1773 X_test=444 Y_train=1773 Y_test=444
2018-02-01 00:01:30,664 - keras-dnn - INFO - creating sequential model
2018-02-01 00:01:30,705 - keras-dnn - INFO - compiling model
2018-02-01 00:01:30,740 - keras-dnn - INFO - fitting model - please wait
Train on 1773 samples, validate on 444 samples
Epoch 1/50
2018-02-01 00:01:30.947551: I tensorflow/core/platform/cpu_feature_guard.cc:137] Your CPU supports instructions that this TensorFlow binary was not compiled to use: SSE4.1 SSE4.2 AVX AVX2
1773/1773 [==============================] - 1s 704us/step - loss: 2.5727 - acc: 0.8404 - val_loss: 2.6863 - val_acc: 0.8333
Epoch 2/50
1773/1773 [==============================] - 1s 626us/step - loss: 2.5727 - acc: 0.8404 - val_loss: 2.6863 - val_acc: 0.8333

...

Epoch 50/50
1773/1773 [==============================] - 1s 629us/step - loss: 2.5727 - acc: 0.8404 - val_loss: 2.6863 - val_acc: 0.8333
444/444 [==============================] - 0s 17us/step
2018-02-01 00:02:29,118 - keras-dnn - INFO - Accuracy: 83.33333333333334
Optional Tweaks
Colorized Logging for Debugging
Export the path to the colorized logger config. This examples assumes you are in the base directory of the repository.
export LOG_CFG=$(pwd)/network_pipeline/log/colors-logging.json